Renovation- Week 4

Wednesday 24 July 2013

As the builders continue to progress at a rapid pace our days of living in the house are numbered.  It won't be long until work begins inside the existing house and it would be good for the builders to have the option of working indoors with all of this wet weather.   It was also timely to have my Mum's 60th birthday this week so I decided to pack up the kids and drive to Emerald to surprise Mum.  We will stay here for a couple of weeks while Hubby M bunks down and finishes packing up the last contents of the house.

Enjoying sunny and warm Emerald.

It was a huge effort to sort and pack the items that we would need not only for the next two weeks in Emerald but for the next 3 months until the house is completed.  Add in two sick children, a kindy open day, more rain and a 14 hour drive to Emerald and it was a hectic week with very little sleep.  Of course it rained the day that Hubby M needed to move the remaining large items out of the house!  Fortunately he had the help of some lovely friends and relatives and many hands made light work.


Hubby M's efforts to combat the mud and rain.
At least the excitement of our back deck kept us motivated.  We're really happy with the addition of the balustrades and valance.  I just can't wait to remove the garden shed and plant a lovely tree in the back corner of the yard!


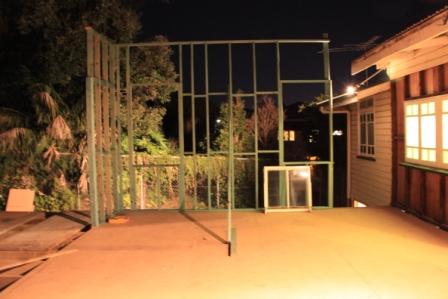
The wall frame on the western wall will be extended up to meet the bottom of the valance rather than have a gap between the two.  I hope this is the right decision.  I'm still undecided on whether to line the inside of this wall with FC sheet or chamferboard.


The scaffolding arrived and reinforced that it really was time for me and the kids to move out!  I'm still not sure where we will live when we return from Emerald. Any suggestions of a fully furnished apartment we can rent for a couple of months in Brisbane???


Renovation- Week 3

Monday 15 July 2013

We made the decision to stay in the house while Builder B completed the first stage of the renovation which is the extension to the rear.  You would have seen in our Week 2 post that the back door was relocated to the living room wall and we were confined to the front of the house.  It's just like having an old outhouse with our bathroom now detached from our living space!

The living space we are confined to.
An open air walk to the bathroom.
Master H and Miss O are enjoying the novelty of eating dinner in front of the telly but Mum E and Hubby M are feeling the strain of such a small living space.  And with all this wet weather it would have been good for the house to be empty so that the Builder B could be making progress inside on rainy days.

Dinnertime at our Family Home.
But despite the rain, Builder B and Builder A have continued to make great progress at the rear of the house.
  

Kitchen ceiling and roof cut back to allow for new 3.2m high wall frame.
Raked ceiling and back wall of the house will be removed in due course.

Bathroom/Dining room wall and roof removed and new frame erected.

Ply bracing added to rear wall of the house.


Outdoor kitchen/laundry wall frame erected.


Tarps placed over roof openings to keep the rain out.
 
Trips to the bathroom are a bit chilly!


Deck posts and beams erected.


Kwila decking going down.
 

FC sheet and nib wall installed for laundry cupboard/kitchen bench.

This is an area where I would appreciate your advice.  You will see below that the plan is to run a decorative balustrade valance around the top of the deck to try and break up the height.

So on the laundry/outdoor kitchen, western wall it will look like this...


Exterior view of the outdoor kitchen/laundry on the deck.

We have decided to raise the height of the wall so that the valance will only be around 450mm.  But now we need to decide what finish to have on the internal wall.  There will be a cupboard for the washing machine and dryer with a benchtop and sink that can be used when cooking with the adjacent barbeque. 
-Do you think we will need a splashback?
-Should we use chamferboard or FC sheet on the internal wall that runs up to the valance?

Flashback Friday- Family Home Number 2

Friday 12 July 2013

In 2006 we took the opportunity to upgrade from our first home to a property closer to the city.  We purchased a lovely little Queenslander from its original owner.  The house was very much showing its age and in need of a makeover!  The house is located in a DCP (Demolition Control Precinct) so any plans had to meet specific guidelines to maintain the character and architectural style of the home and be approved by Council.  And while the house was on a 579sqm block it was subject to the Residential Design Small Lot Code because it had an average block width of less than 15 meters.  We stayed on in our first home and left the house unoccupied for 6 months while we planned our renovation with a builder.    


Our first goal was to relocate the one and only toilet from a cupboard (on carpet!!!) in the second bedroom and close off the tiny opening allowing access from the kitchen.


What were they thinking?

Other than that, there were no major surprises or issues to deal with.  We chose to open back up the front verandah that had been enclosed at some point and close off the side sleepout to create a third bedroom or study.  We removed the wall that separated the living room from the kitchen and dining areas and added a back deck and new rear stairs.  It was an expensive exercise to replace all of the aluminium windows with traditional timber double hung windows but well worth it.  We saved money where we could by opting to paint the interior (never again!), replace the battens under the house, erect a garage and fences plus landscape ourselves.  We organised our own contractors to paint the exterior, do the tiling and polish the floors to make more savings.  It was a busy three years of hard work but we were more than happy with the results.


We completed the landscaping just as I became pregnant with our first child.  Perfect timing to relax and enjoy our family home!  But then we spotted the 'For Sale' sign on a house a few doors down the street...  and as if welcoming our first child into the world wasn't enough to worry about, we purchased another property and listed our home for sale.  I must say it was interesting having real estate agents visit us at the Mater Mothers Hospital to sign contracts and breastfeeding in the car while our house was open for inspection!  We negotiated a 60 day settlement on the sale of our house so that we had this period of time to renovate the new house up to a liveable state for Baby Master H.  Looking back, I don't know how we survived!  We were crazy to inflict this upon ourselves but I'm glad we secured a great property.
  
4 week old Master H and our Family Home.


Renovation- Week 2

Monday 8 July 2013

The cement mixer arrived.
The Apprentice battled with the wheelbarrow in the mud.
Builder B concreted in the stumps.
The posts were completed.
 
Floor joists were added.

More timber arrived.
 
The noggins were nailed in place.
 
Yellow tongue floor sheeting down.
Dining room wall frame and outdoor kitchen/laundry wall frame up.

Living Room wall frame up.
The shipping container was delivered.
 
The packing began.
  
The kitchen was gutted.
The back door was temporarily relocated to lock up the house.
We set up camp in the living room!


Flashback Friday- Family Home Number 1

Friday 5 July 2013

We are actually repeat offenders when it comes to buying 'renovators' delights'!  We look past an undesirable facade and see potential.  It all began back in 2001 when at 22 and 23 years of age we decided to enter the housing market and buy a modest post-war home. 

Big smiles as we got the keys for our first home. 
We had no idea what we were in for!
The house was on a decent size block in a good location.  It had good bones even if the decor was a little dated!

Elated on the first night in our new home!
Check out the tiles, lino and curtains!

Discussing renovation plans in the bathroom.

It wasn't a huge renovation but we were kept busy over the five years of ownership.  We got straight into pulling up the carpet to reveal the beautiful blackbutt timber floors.  We removed a wall that separated the living, dining and kitchen rooms to create one open space.  Painting the walls and ceilings was a big task but saved us money to leave the exterior painting to the professionals.

Let the fun begin!

We gutted the bathroom and created a more functional and modern room.  The kitchen stayed as it was except some white tile paint did the trick at updating the pink floral tile splashback.  The dodgy carport had to go and Hubby M had his dream Titan shed erected in the back yard.  Lastly we tackled the gardens.  It took several attempts to fill the garden beds as our labradors acquired a taste for camellias!

So proud of his handy work!
Loving our old hand-me-down polycane furniture from the Grandparents!

Can you see the lengths we went to to keep the dogs out?
(And yes she is wearing a party hat!)


He even tried to help with the electrical work!

The fences were replaced and we were comfortable.  Comfortable, but ready for the next project!  In 2006 we spotted a real diamond in the rough so it was time to say goodbye to our first family home.  We were proud of what we had achieved and keen to apply what we had learnt to a new property.  However, it was sad to leave that humble little home where we started our lives together.  The place where we worked hard and dreamt big, where we learnt about renovating and learnt about each other, where we were engaged and married.  That house really set us up for life together.


Goodbye Family Home #1!